0%

退火算法学习-TSP问题

旅行商问题(TSP)是一个经典的组合优化问题,它的目标是找到连接n个城市的最短路径。该问题是一个NP难问题,也就是说,没有已知的多项式时间算法可以解决它。

退火算法

退火算法是受物理中固体物质退火原理的启发而提出的一种全局优化算法。该算法模拟固体物质在高温下逐渐冷却的过程,使得固体物质逐渐达到最低能量状态的过程。在退火算法中,我们也将搜索过程看作是一个逐渐降温的过程,使得算法逐渐趋近于全局最优解。

退火算法的基本步骤如下:

  1. 初始化一个初始解,例如一个随机排列。
  2. 设定一个初始温度,然后将温度逐渐降低。
  3. 在每个温度下,通过对当前解进行小的随机扰动,生成一个新的解。
  4. 计算新的解与当前解之间的能量差,然后根据一定的概率接受或拒绝新的解。
  5. 重复步骤3和4,直到温度降低到某个终止条件或者达到一定的迭代次数。

解决TSP问题

退火算法可以用来解决TSP问题,其基本思路是通过随机交换路径上的城市,生成新的路径,然后计算新路径和当前路径之间的差距,并根据一定的概率来接受或拒绝新路径。通过逐渐降低温度,我们期望算法能够收敛到一个全局最优解。

退火算法中的温度是一个很重要的参数。初始温度应该足够高,以便于算法能够在整个搜索空间中进行探索。随着搜索的进行,温度逐渐降低,使得算法更加倾向于接受更优的解,而减少对不优解的接受。同时,降温的速度也需要适当调整,以便于算法能够在搜索空间中逐渐收敛到全局最优解。

代码演示

提供一个简单的Python代码演示,用于解决一个5个城市的TSP问题。使用了一个包含5个城市的简单例子,以演示如何使用退火算法来解决TSP问题。首先定义了一些帮助函数,用于计算城市之间的距离、路径的总长度等等。然后,我们定义了一个simulated_annealing函数,用于执行退火算法。最后,我们使用一个包含5个城市的例子来测试算法,并输出最短路径和最短距离。解释一下,这里的距离之所以用两点坐标演示是为了直观。

1
2
3
4
5
6
7
8
9
10
11
12
13
14
15
16
17
18
19
20
21
22
23
24
25
26
27
28
29
30
31
32
33
34
35
36
37
38
39
40
41
42
43
44
45
46
47
48
49
50
51
52
53
54
55
56
57
58
59
import random
import math

# 城市坐标
cities = [(60, 200), (180, 200), (80, 180), (140, 180), (20, 160)]

# 计算路径长度
def path_length(path):
total_length = 0
# 计算路径上每一对相邻城市之间的距离之和
for i in range(len(path)-1):
city1 = path[i]
city2 = path[i+1]
x1, y1 = cities[city1]
x2, y2 = cities[city2]
dist = math.sqrt((x2-x1)**2 + (y2-y1)**2)
total_length += dist
return total_length

# 随机交换两个城市的位置
def swap_cities(path):
new_path = path.copy()
# 随机选择两个城市的位置并交换
index1 = random.randint(0, len(path)-1)
index2 = random.randint(0, len(path)-1)
new_path[index1], new_path[index2] = new_path[index2], new_path[index1]
return new_path

# 退火算法
def simulated_annealing():
# 初始化路径
path = [0, 1, 2, 3, 4]
random.shuffle(path)
temperature = 1000 # 初始温度
cooling_rate = 0.003 # 冷却速率
while temperature > 1:
# 随机交换两个城市的位置
new_path = swap_cities(path)
# 计算新路径和当前路径的长度
current_length = path_length(path)
new_length = path_length(new_path)
# 如果新路径更短则接受
if new_length < current_length:
path = new_path
else:
# 如果新路径更长则以一定概率接受
delta = new_length - current_length
acceptance_probability = math.exp(-delta/temperature)
if random.random() < acceptance_probability:
path = new_path
# 降低温度
temperature *= 1 - cooling_rate
return path

# 输出结果
path = simulated_annealing()
print("最短路径:", path)
print("路径长度:", path_length(path))

运行上述Python代码后,输出应该是类似以下的结果:

1
2
最短路径: [1, 0, 2, 4, 3]
路径长度: 326.2397349459408

其中,最短路径表示经过五个城市的顺序,路径长度表示整个路径的长度。由于算法随机初始化路径和交换城市的顺序,因此每次运行的结果可能会有所不同,但是路径长度应该逐渐逼近最优解。

修改

  1. 将路径长度的计算方式改为使用numpy的函数向量化计算,可以提高计算效率。 2.将随机交换两个城市的位置的函数改为随机选择两个位置并交换,避免出现重复的位置。 3.将参数和常量提取为全局变量,方便进行调整。 4.在输出结果时加上可读性,例如将城市的坐标和路径的顺序都打印出来,便于理解和分析结果。
1
2
3
4
5
6
7
8
9
10
11
12
13
14
15
16
17
18
19
20
21
22
23
24
25
26
27
28
29
30
31
32
33
34
35
36
37
38
39
40
41
42
43
44
45
46
47
48
49
50
51
52
53
54
55
56
57
58
import random
import math
import numpy as np

# 城市坐标
cities = [(60, 200), (180, 200), (80, 180), (140, 180), (20, 160)]

# 计算路径长度
def path_length(path):
# 计算路径上每一对相邻城市之间的距离之和
distances = np.linalg.norm(np.diff(np.array([cities[i] for i in path]), axis=0), axis=1)
total_length = np.sum(distances)
return total_length

# 随机交换两个城市的位置
def swap_cities(path):
new_path = path.copy()
# 随机选择两个位置并交换
index1, index2 = random.sample(range(len(path)), 2)
new_path[index1], new_path[index2] = new_path[index2], new_path[index1]
return new_path

# 退火算法
def simulated_annealing(initial_temperature, cooling_rate):
# 初始化路径
path = list(range(len(cities)))
random.shuffle(path)
temperature = initial_temperature # 初始温度
while temperature > 1:
# 随机交换两个城市的位置
new_path = swap_cities(path)
# 计算新路径和当前路径的长度
current_length = path_length(path)
new_length = path_length(new_path)
# 如果新路径更短则接受
if new_length < current_length:
path = new_path
else:
# 如果新路径更长则以一定概率接受
delta = new_length - current_length
acceptance_probability = math.exp(-delta/temperature)
if random.random() < acceptance_probability:
path = new_path
# 降低温度
temperature *= 1 - cooling_rate
return path

# 退火算法的参数和常量
initial_temperature = 1000
cooling_rate = 0.003

# 输出结果
path = simulated_annealing(initial_temperature, cooling_rate)
print("最短路径:")
for i in range(len(path)):
print(f"第{i+1}个城市的坐标为{cities[path[i]]}")
print(f"路径顺序为{path}")
print("路径长度:", path_length(path))

其他的简单的退火算法例子

  1. 使用退火算法求解函数最小值 假设有一个函数 f(x),我们的目标是求解该函数的最小值。可以使用退火算法进行优化,其中 x 表示函数的自变量。具体实现如下:
    1
    2
    3
    4
    5
    6
    7
    8
    9
    10
    11
    12
    13
    14
    15
    16
    17
    18
    19
    20
    21
    22
    23
    24
    25
    26
    27
    28
    29
    30
    31
    32
    33
    34
    35
    36
    import random
    import math

    # 待优化的函数
    def f(x):
    return math.sin(10*x) * x + math.cos(2*x) * x

    # 退火算法
    def simulated_annealing():
    # 初始解
    x = random.uniform(-10, 10)
    # 初始温度
    temperature = 100
    # 冷却速率
    cooling_rate = 0.003
    while temperature > 1:
    # 随机生成新解
    new_x = random.uniform(-10, 10)
    # 计算新解和当前解之间的差距
    delta = f(new_x) - f(x)
    # 如果新解更优则接受
    if delta < 0:
    x = new_x
    else:
    # 如果新解更差则以一定概率接受
    acceptance_probability = math.exp(-delta/temperature)
    if random.random() < acceptance_probability:
    x = new_x
    # 降低温度
    temperature *= 1 - cooling_rate
    return x

    # 输出结果
    x = simulated_annealing()
    print("最优解:", x)
    print("函数最小值:", f(x))
  2. 0/1背包问题
    1
    2
    3
    4
    5
    6
    7
    8
    9
    10
    11
    12
    13
    14
    15
    16
    17
    18
    19
    20
    21
    22
    23
    24
    25
    26
    27
    28
    29
    30
    31
    32
    33
    34
    35
    36
    37
    38
    39
    40
    41
    42
    43
    44
    45
    46
    47
    48
    49
    50
    51
    52
    53
    54
    55
    56
    57
    58
    59
    60
    61
    62
    63
    64
    import random
    import math

    # 定义背包问题的物品数量、背包容量、物品价值和重量
    n = 20
    C = 50
    v = [random.randint(1, 10) for i in range(n)]
    w = [random.randint(1, 10) for i in range(n)]

    # 定义退火算法的参数:初始温度、终止温度、降温速度、迭代次数
    T0 = 1000
    Tend = 1e-8
    alpha = 0.99
    iter_max = 10000

    # 初始化解空间
    x = [random.randint(0, 1) for i in range(n)]

    # 定义目标函数
    def objective(x):
    return sum([x[i] * v[i] for i in range(n)])

    # 定义邻域搜索算法:随机选择一个物品,将其放入或移除背包中
    def neighbor(x):
    i = random.randint(0, n-1)
    x_new = x.copy()
    x_new[i] = 1 - x_new[i] # 将0变成1,将1变成0
    return x_new

    # 定义Metropolis准则
    def metropolis(delta, t):
    return math.exp(delta/t)

    # 定义退火算法
    def simulated_annealing(T0, Tend, alpha, iter_max):
    x_best = x.copy()
    f_best = objective(x_best)
    t = T0
    iter = 0
    while t > Tend and iter < iter_max:
    x_new = neighbor(x)
    f_new = objective(x_new)
    delta = f_new - f_best
    if delta > 0:
    x_best = x_new.copy()
    f_best = f_new
    else:
    p = metropolis(delta, t)
    if random.random() < p:
    x_best = x_new.copy()
    f_best = f_new
    t *= alpha
    iter += 1
    return x_best, f_best

    # 运行退火算法
    x_best, f_best = simulated_annealing(T0, Tend, alpha, iter_max)

    # 输出结果
    print("物品价值:", v)
    print("物品重量:", w)
    print("背包容量:", C)
    print("最优解:", x_best)
    print("最优解的价值:", f_best)
题目描述

设有集合 ,二元关系 是从 的幂集 到所有的 的函数的关系,即 ,定义为对任意的 。证明: 是双射函数。

解题思路

为证明 是双射函数,我们需要证明其既是单射函数又是满射函数。

单射性证明

要证明 是单射函数,即对于任意两个子集 ,如果 ,则必须有

由题可知,,因此假设 ,则有 。根据定义,对于 ,当 时,,否则 ;同理,当 时,当 时,,否则 。因此, 当且仅当 当且仅当 ,即

因此, 是单射函数。

满射性证明

要证明 是满射函数,需要证明对于任意 ,都存在 使得

对于任意 ,令 ,即 中所有使得 的元素的集合。下面我们将证明

首先证明 ,即对于任意 ,有

由于 的定义是 ,其中 ,因此对于任意 ,有

的定义可知,对于任意 ,有 ,因此 。对于任意 ,有 ,因此 。因此 ,即

其次证明 ,即对于任意 ,有

对于任意 ,分两种情况讨论:

,则由 的定义可知 ,因此存在 使得 ,且对于任意 ,有 。因此 ,有

,则由 的定义可知 ,因此对于任意 ,都有 。因此 ,有

综上所述,对于任意 ,有 ,即

因此,根据 ,可以得到 ,即 是满射函数。

证毕。 ## 总结

本题通过分别证明 的单射性和满射性,证明了 是双射函数。本题考察了集合、幂集、函数等离散数学基础知识,对于巩固这些知识,提高分析问题和证明能力有很大帮助。

数学公式测试MathJax(✅)

Mermaid测试画图工具Mermaid(✅)

            graph TD
            A[Hard] -->|Text| B(Round)
B --> C{Decision}
C -->|One| D[Result 1]
C -->|Two| E[Result 2]
          

样式测试

1.左边的侧边栏启动按钮三种形态(✅)

2.侧边栏的头像(✅)

3.头像旋转(✅)

4.github链接 gmail链接(✅)

代码段粘贴测试

  • mac样式(✅)
  • 复制粘贴功能(✅)
  • 代码高亮(✅)
    1
    2
    3
    4
    5
    6
    #include <stdio.h>
    int main()
    {
    printf("Hello World!\n");
    return 0;
    }

右上角githublogo超链接(✅)

源码分享

1
<a href="https://github/Jimase" class="github-corner" aria-label="View source on GitHub"><svg width="80" height="80" viewBox="0 0 250 250" style="fill:#151513; color:#fff; position: absolute; top: 0; border: 0; right: 0;" aria-hidden="true"><path d="M0,0 L115,115 L130,115 L142,142 L250,250 L250,0 Z"></path><path d="M128.3,109.0 C113.8,99.7 119.0,89.6 119.0,89.6 C122.0,82.7 120.5,78.6 120.5,78.6 C119.2,72.0 123.4,76.3 123.4,76.3 C127.3,80.9 125.5,87.3 125.5,87.3 C122.9,97.6 130.6,101.9 134.4,103.2" fill="currentColor" style="transform-origin: 130px 106px;" class="octo-arm"></path><path d="M115.0,115.0 C114.9,115.1 118.7,116.5 119.8,115.4 L133.7,101.6 C136.9,99.2 139.9,98.4 142.2,98.6 C133.8,88.0 127.5,74.4 143.8,58.0 C148.5,53.4 154.0,51.2 159.7,51.0 C160.3,49.4 163.2,43.6 171.4,40.1 C171.4,40.1 176.1,42.5 178.8,56.2 C183.1,58.6 187.2,61.8 190.9,65.4 C194.5,69.0 197.7,73.2 200.1,77.6 C213.8,80.2 216.3,84.9 216.3,84.9 C212.7,93.1 206.9,96.0 205.4,96.6 C205.1,102.4 203.0,107.8 198.3,112.5 C181.9,128.9 168.3,122.5 157.7,114.1 C157.9,116.9 156.7,120.9 152.7,124.9 L141.0,136.5 C139.8,137.7 141.6,141.9 141.8,141.8 Z" fill="currentColor" class="octo-body"></path></svg></a><style>.github-corner:hover .octo-arm{animation:octocat-wave 560ms ease-in-out}@keyframes octocat-wave{0%,100%{transform:rotate(0)}20%,60%{transform:rotate(-25deg)}40%,80%{transform:rotate(10deg)}}@media (max-width:500px){.github-corner:hover .octo-arm{animation:none}.github-corner .octo-arm{animation:octocat-wave 560ms ease-in-out}}</style>

5.ali和wechat打赏(✅)

6.简单的网站统计(✅)

7.视频功能测试(✅)

网络集成与设计实践4 接入部分设计

[任务目标]

掌握默认路由重分布。 掌握动态NAPT 掌握静态NAPT 掌握使用NAT隐藏外部主机真实地址

[任务内容]

  • 一个企业网接入ISP部分设计拓扑如图所示。S1是核心层交换机,R1是接入ISP的边界路由器,企业网内部采用OSPF路由。要求 (1)在R1上设置默认路由重分布,使得内网的三层交换机的默认路由最终指向R1方向。 (2)在R1上配置动态NAPT使得内网10.0.2.0/24能访问外网。 (3)在R1上配置静态NAPT,使得外网的主机能访问内网的服务器。静态NAPT映射如下: 10.0.1.1:80->100.1.1.1:80 10.0.1.2:20->100.1.1.1:20 10.0.1.2:21->100.1.1.1:21 (4)在R1上使用NAT隐藏外部主机真实地址。外部真实主机到内部地址的映射为: 100.1.2.1->10.1.1.1

[操作人员]

年级 专业 学号 姓名


[任务记录]

R1

1
2
3
4
5
6
R1(config)#int f0/0
R1(config-if)#ip add 100.1.1.1 255.255.255.252
R1(config-if)#no shut
R1(config-if)#int f0/1
R1(config-if)#ip add 10.0.0.2 255.255.255.252
R1(config-if)#no shut

isp

1
2
3
4
5
6
R2(config)#int f0/0
R2(config-if)#ip add 100.1.1.2 255.255.255.252
R2(config-if)#no shut
R2(config-if)#int f0/1
R2(config-if)#ip add 100.1.2.254 255.255.255.0
R2(config-if)#no shut

S1

1
2
3
4
5
6
7
8
9
10
11
12
13
14
15
16
17
S1#conf t
S1(config)#int e0/0
S1(config-if)#no shut
S1(config-if)#no switchport
S1(config-if)#ip add 10.0.0.1 255.255.255.252

S1(config)#int e0/1
S1(config-if)#no switchport
S1(config-if)#ip add 10.0.2.254 255.255.255.0

S1(config)#int e0/2
S1(config-if)#no switchport
S1(config-if)#ip add 10.0.3.254 255.255.255.0

S1(config)#int vlan 1
S1(config-if)#ip add 10.0.1.254 255.255.255.0
S1(config-if)#no shut

PC1

1
2
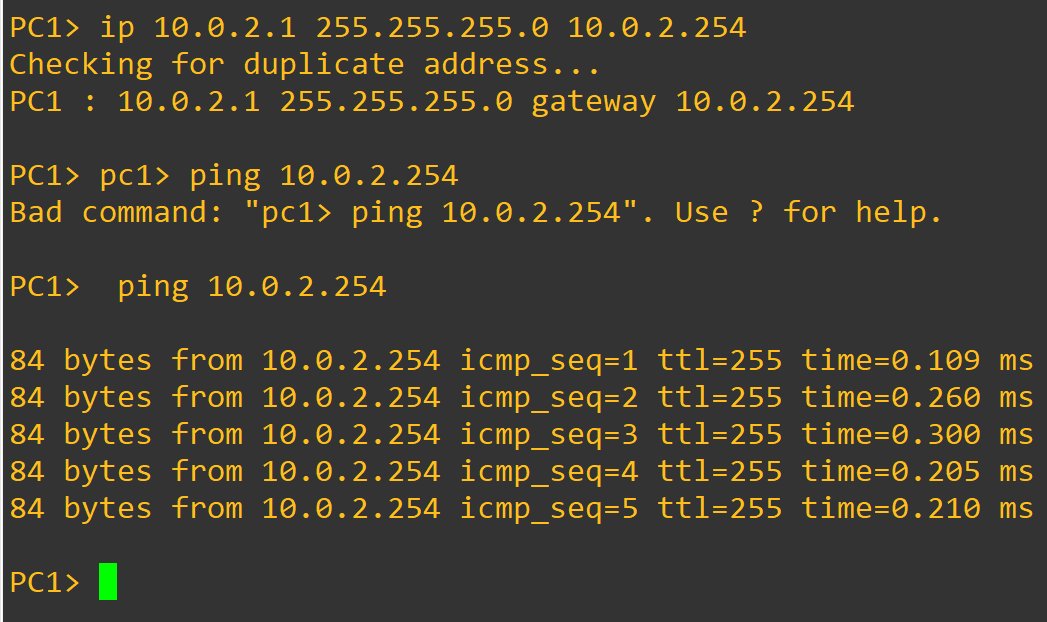
pc1> ip 10.0.2.1 255.255.255.0 10.0.2.254
pc1> ping 10.0.2.254

PC2

1
2
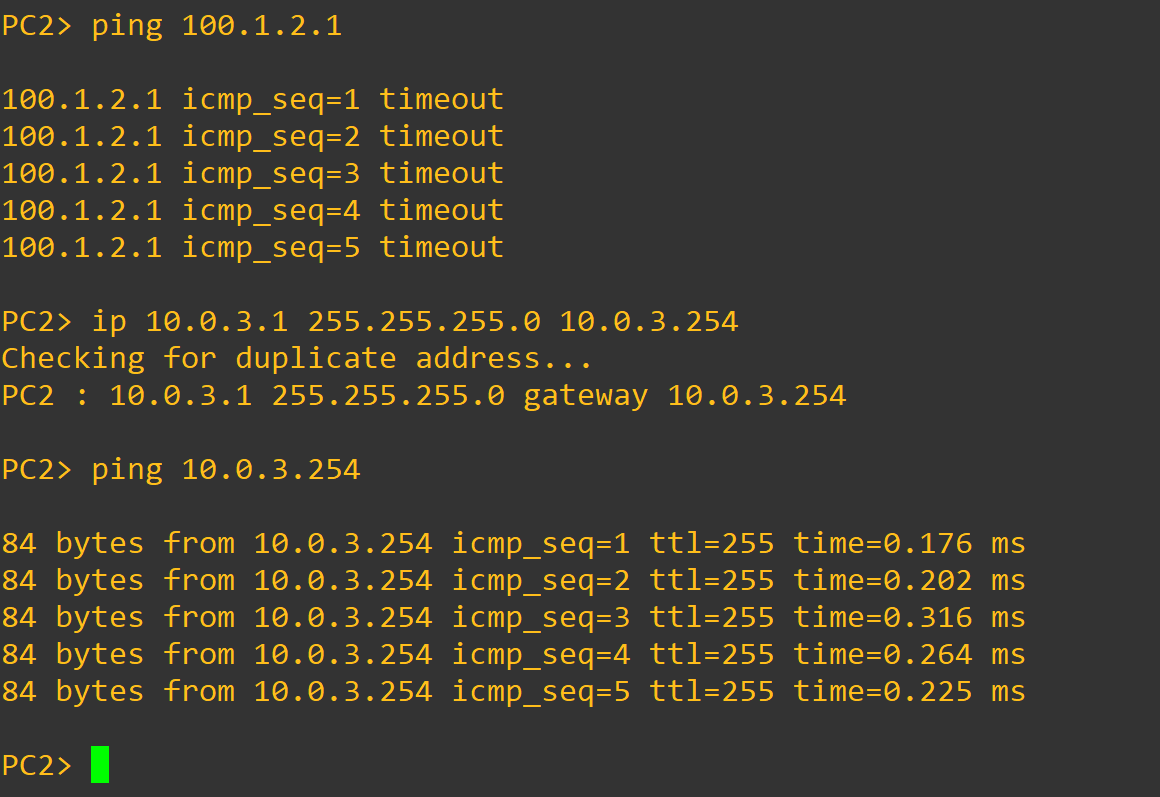
pc2> ip 10.0.3.1 255.255.255.0 10.0.3.254
pc2> ping 10.0.3.254

S1

1
2
S1(config-if)#exit
S1(config)#no ip cef
去看视频 39.00

  • 新建web服务器

  • 新建FTP服务器

    • 接口VMnet3
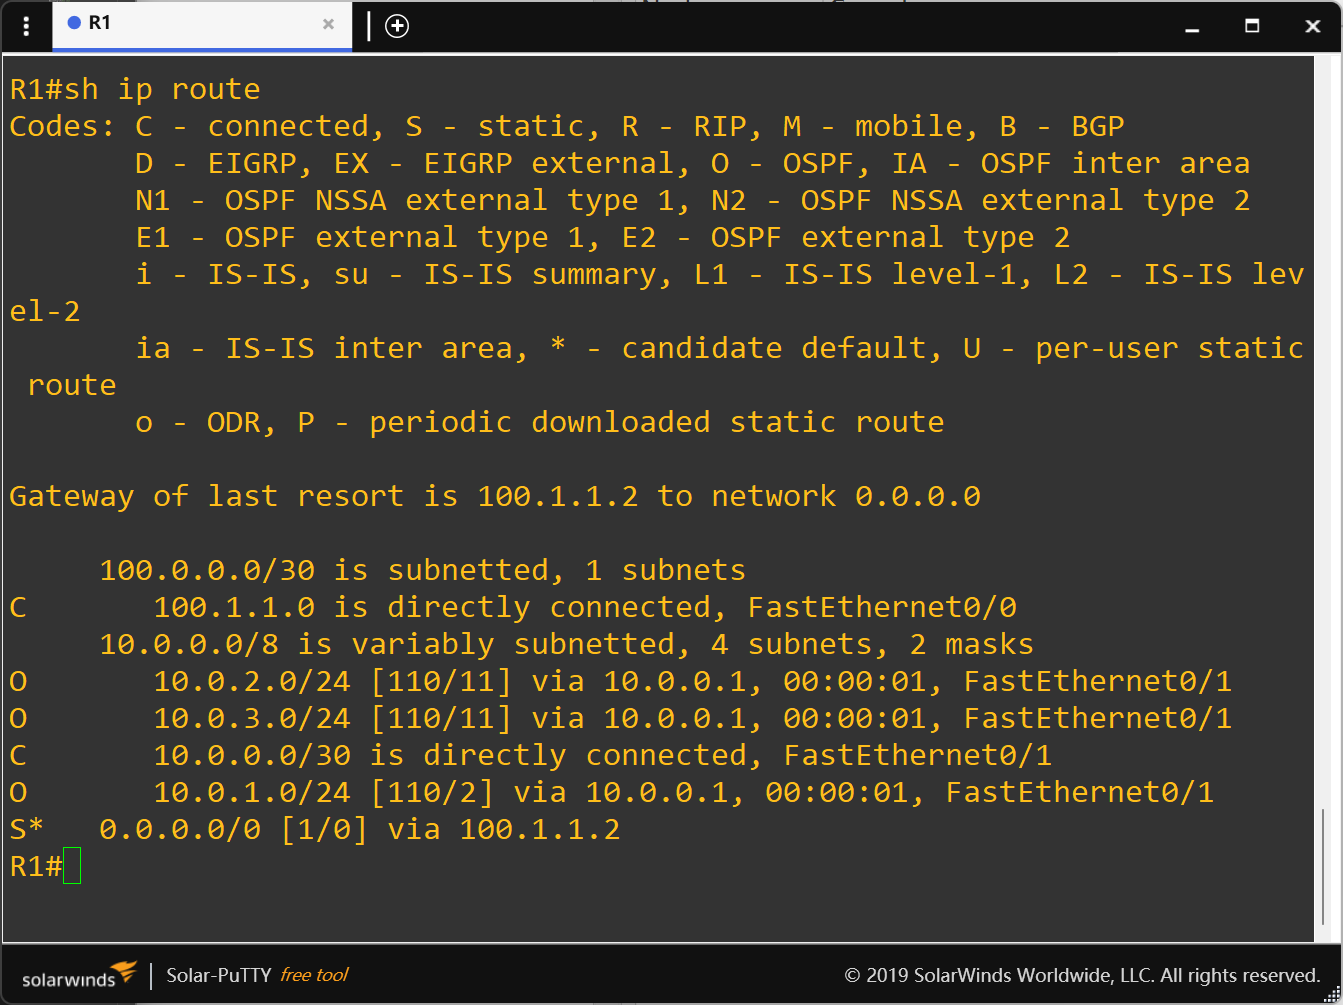
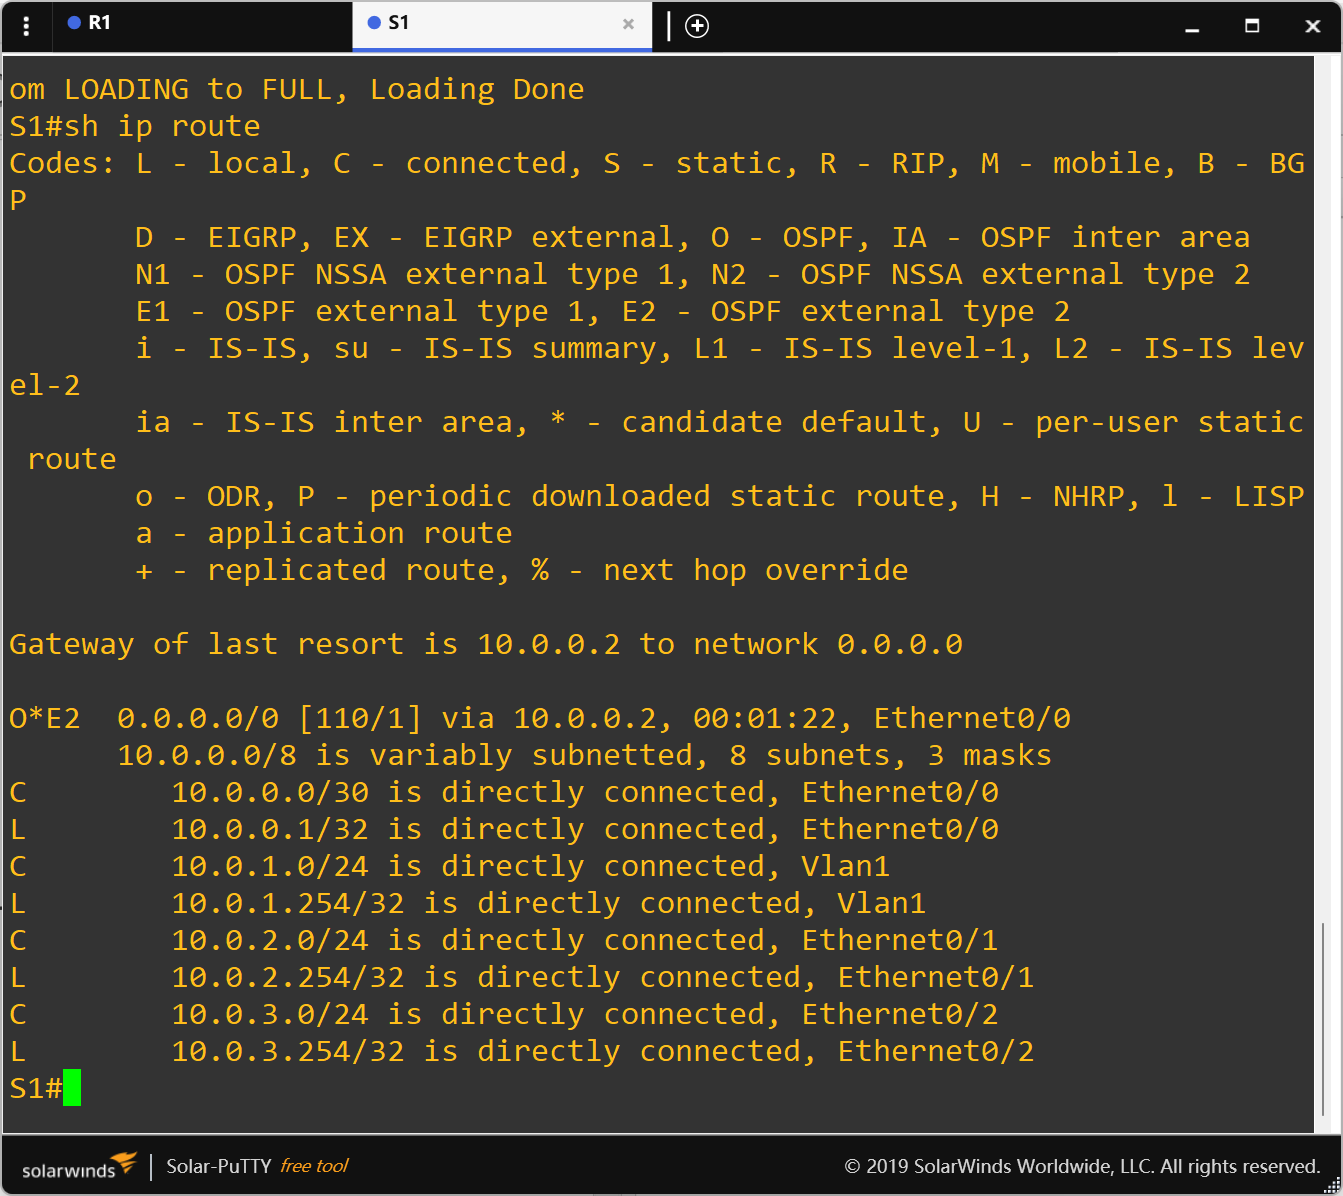
  • 配置默认路由重分布 R1

    1
    2
    3
    4
    5
    conf t
    ip route 0.0.0.0 0.0.0.0 100.1.1.2
    router ospf 1
    net 10.0.0.0 0.0.0.3 area 0
    default-information originate always

S1

1
2
3
4
router ospf 1
net 0.0.0.0 255.255.255.255 area 0
end
sh ip route

  • 动态NAPT配置

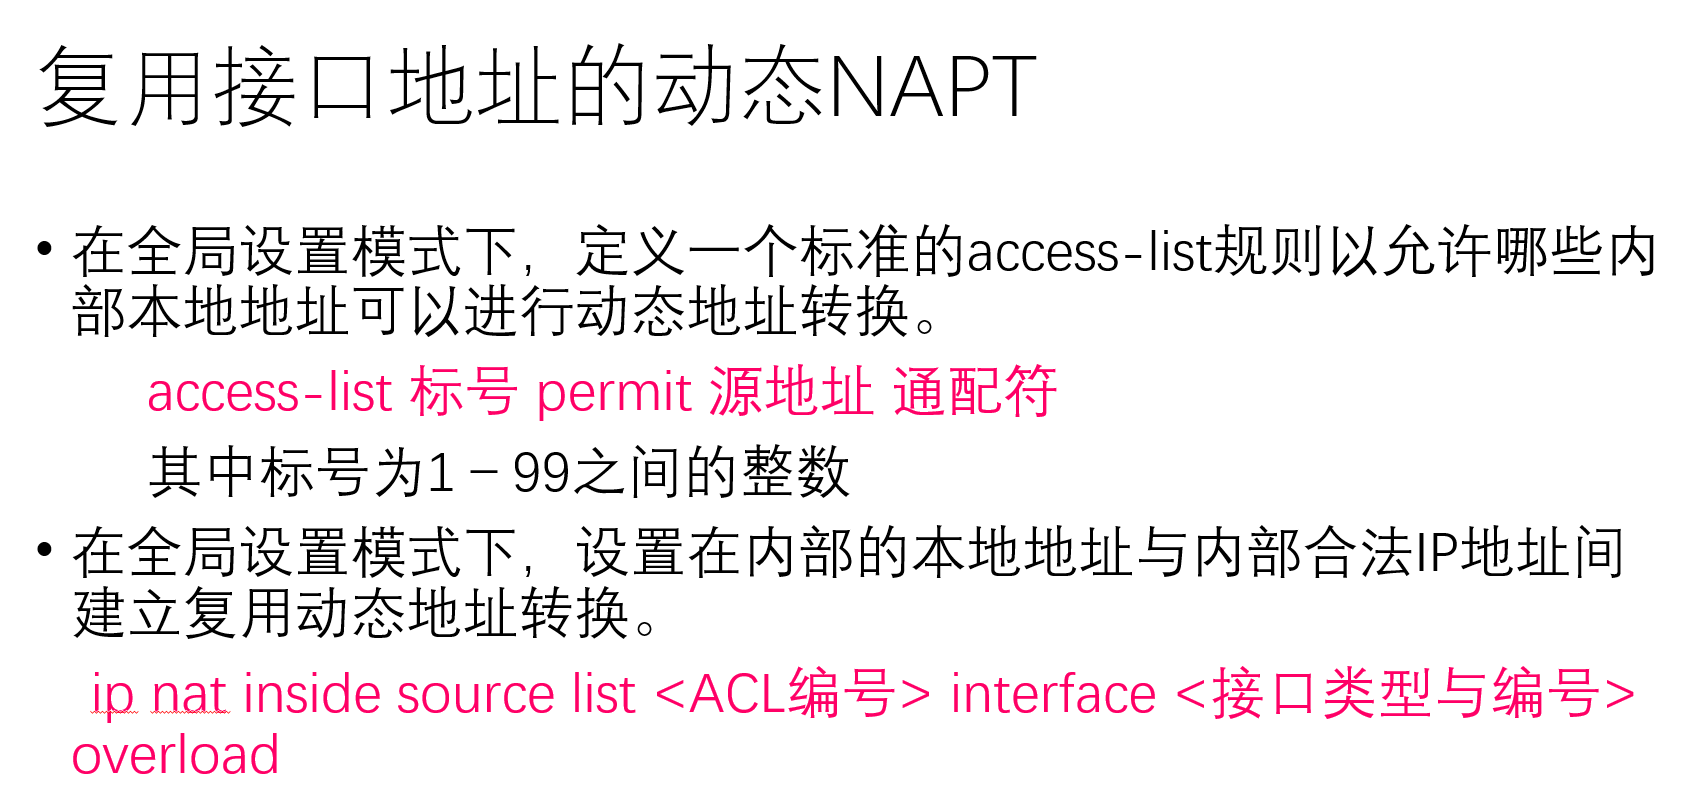
  • 在R1上配置动态NAPT使得内网10.0.2.0/24能访问外网。 R1

    1
    2
    3
    4
    5
    6
    7
    8
    9
    conf t
    access-list 1 permit 10.0.2.0 0.0.0.255
    ip nat inside source list 1 interface f0/0 overload
    int f0/1
    ip nat inside
    int f0/0
    ip nat outside
    end
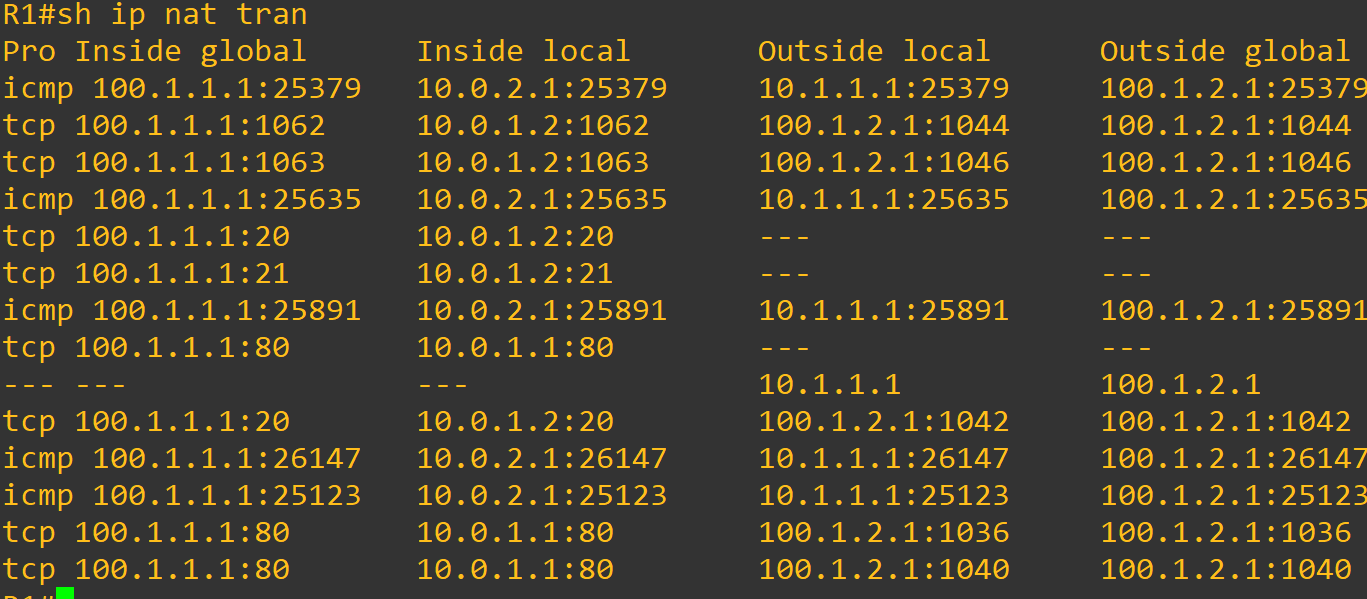
    sh ip nat translation

  • 静态NAPT > 在R1上配置静态NAPT,使得外网的主机能访问内网的服务器。静态NAPT映射如下: 10.0.1.1:80->100.1.1.1:80 10.0.1.2:20->100.1.1.1:20(ftp) 10.0.1.2:21->100.1.1.1:21(ftp)

R1

1
2
3
4
5
6
7
conf t
ip nat inside source static tcp 10.0.1.1 80 100.1.1.1 80
ip nat inside source static tcp 10.0.1.2 20 100.1.1.1 20
ip nat inside source static tcp 10.0.1.2 21 100.1.1.1 21
end
sh ip int b
show ip nat translation

R1

1
ip nat outside source static 100.1.2.1 10.1.1.1 add-route 
- 隐藏外部主机真实地址


  1. GNS3拓扑搭建
  1. 配置接口IP与路由
  2. 配置默认路由重分布 R1: S1:
  3. 配置动态NAPT PC1: PC2:
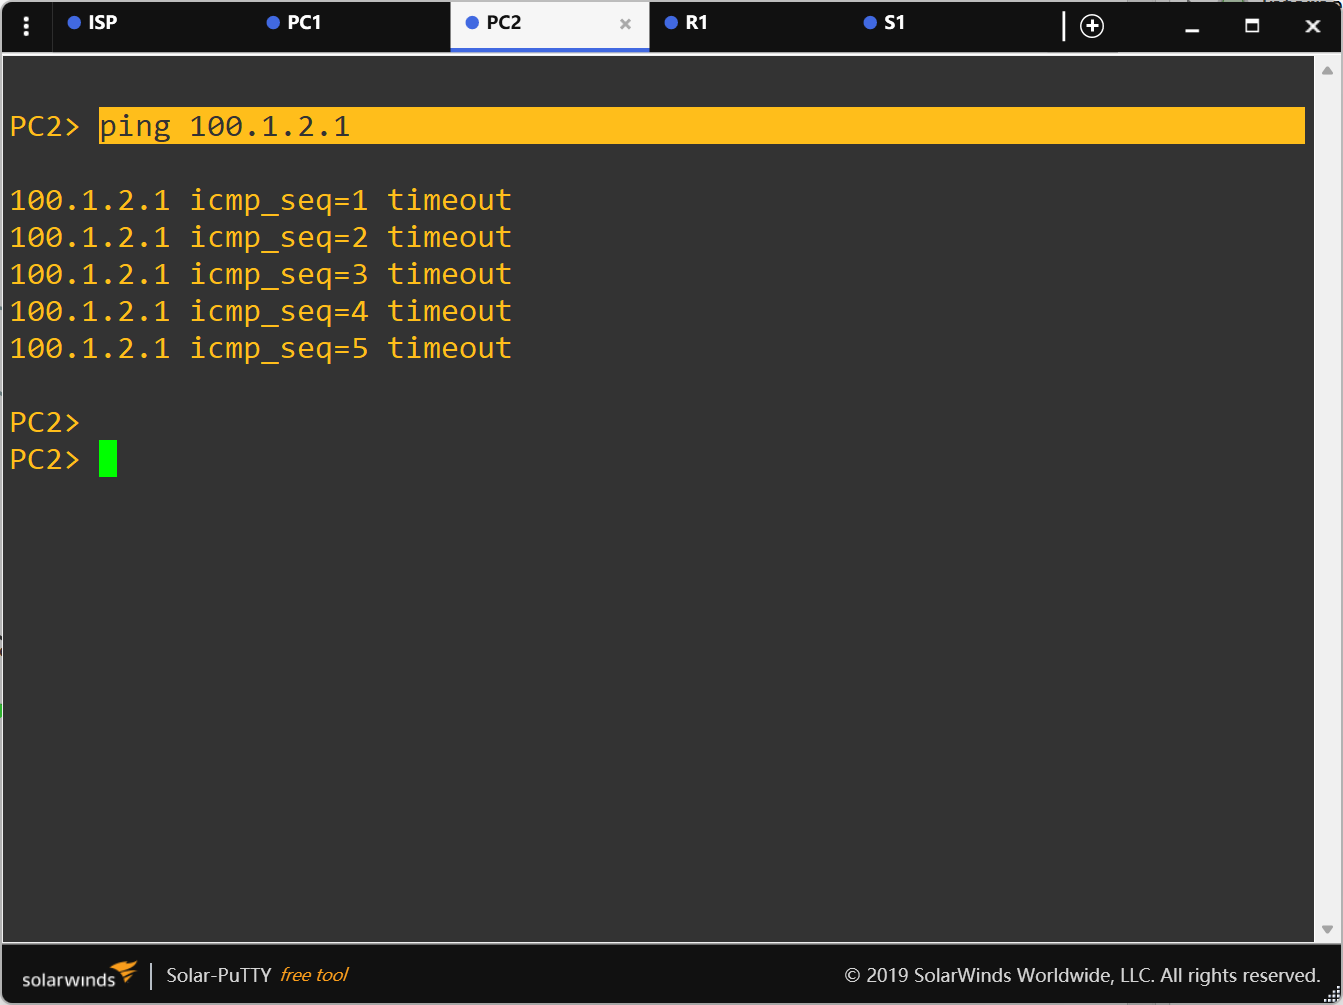
  1. 配置静态NAPT 结果: 测试: img ftp img

after ftp

  1. 隐藏外部主机真实地址
  • (4)在R1上使用NAT隐藏外部主机真实地址。外部真实主机到内部地址的映射为:100.1.2.1->10.1.1.1

R1

1
ip nat outside source static 100.1.2.1 10.1.1.1 add-route